Preface
I’ve always believed this: people can’t imagine things outside what they already know. Even with AI this strong now, you still might not be able to build something you’re truly satisfied with just by prompting. And yes, you might feel anxious too. If AI is so powerful, does learning programming still matter? Won’t programmers be replaced anyway?
I know you have a lot of questions. In my view, times change and answers change every day. Rules that work today may not work tomorrow, and rules that work tomorrow may not work today either. Instead of staying in the dark, I’d rather you understand at least a bit of how things work. Nothing in this world is really that mystical. If possible, touch it with your own hands. I really like this line: “Practice is the only criterion for testing truth.”
Learning a skill is an honorable thing, and it can become a lifelong hobby. Whether you’re in middle school or just entered university, I think it’s worth learning how to use computers well, and even how to code and build projects.
I also think everyone has talent in some area. Sometimes it’s just not discovered yet because of environment or life experience. Maybe I walk past future geniuses every day and they don’t even know it. What I hope is that more students get sparked by one accidental moment when they’re young, then turn that spark into a real hobby.
As for me, I’m from Zhejiang. In high school we had a technical elective, and the information technology part was Python. Back then our school had an OJ problem site. Everyone loved occupying the computers to solve problems, and in free time we explored a lot of fun stuff. We didn’t realize it then, but that was the start of a different life path for many of us.
Whether you’re in engineering or the humanities, I still think it’s useful to understand these core ideas. When you make decisions later, I can’t guarantee you won’t feel confused. Sometimes knowing more actually gives you more confusion first. But then a big question mark appears in your mind, and you finally start thinking in a directed way.
1. What Is Programming
Programming is not as mysterious as it looks. It’s more like an engineering expression skill: break a problem down, arrange the steps, and let the machine execute them reliably.
You don’t need to understand every low-level detail at the beginning. Just remember one thing first: you’re not writing flashy syntax, you’re building a process that can be reproduced, debugged, and maintained.
1.1 Where Programming Sits in the Computer Stack
Think of it as a bottom-up chain. At the bottom is hardware: CPU, memory, and storage. The CPU also has its architecture (x86, ARM), which decides which instruction set the machine can understand.
Above that is the operating system (Windows / Linux / macOS). It manages the hardware and gives programs a unified interface. When your code touches files, network, or windows, the OS is what handles all that underneath.
Programming languages sit in the middle as a translation layer. You write Python or C, but the machine finally executes lower-level instructions. At the top are applications, like the browser or editor you click every day, or the small tools you build yourself.
What are Windows and Linux?
Windows and Linux are operating systems, not programming languages. You can think of them as managers: they allocate hardware resources and define execution rules.
I’ve seen many beginners confuse “I can use Windows” with “I can program.” That’s normal. An OS is more like the runtime environment. It decides how programs access files, request memory, and talk to devices.
The system is the stage, the program is the actor, and the language is how you write the script. Once you separate these roles, a lot of concepts stop mixing together.
1.2 Paths and Directories: Path, Root Directory, Relative Path
You can think of a path as an address and house number. When a program looks for a file, it’s really asking, “Where exactly is it?”
For example, C:\Users\Dan\Desktop\learning\hello.txt is a full address. When you use cd in a terminal, you’re walking to the right floor first, then picking up the file.
Here’s a very common pitfall: Chinese folder names are not always impossible, but with some toolchains, encoding settings, old libraries, or command-line combinations, non-ASCII paths can occasionally cause weird issues. To reduce random trouble, using English folder names is usually safer: short names like test, folder, project, data, output work great.
What is the root directory
In Windows, C:\ is a root. You can treat it like a top-level entry point, then beneath it you have user directories, project directories, and data directories. Long paths are just layers going down from this entry.
What is a relative path
A relative path is written relative to your current directory. An absolute path like C:\Users\Dan\Desktop\learning\hello.txt goes straight to the target. A relative path like .\hello.txt or data\input.txt starts from where you’re standing now.
The most common reason relative paths fail is not that the file doesn’t exist, but that you’re in the wrong directory. You think you’re in learning, but your terminal is still one level above.
Windows users can skip this short part:
On Mac, the root directory is /, and your home directory is usually /Users/your-username.
Relative path rules are the same, typically ./ and ../.
1.3 Architecture Differences: x86 vs ARM
x86 and ARM are two mainstream CPU architectures. You can treat them as two different machine dialects. Traditional PCs have long been mostly x86, phones and tablets are mostly ARM, and new Macs (Apple Silicon) are ARM too.
Your code is always translated into instructions the target architecture can execute. Over time you’ll notice: the same code on different devices can have compatibility differences. Often that’s not your coding mistake, just platform differences underneath.
Where programming languages fit in this system
This is where people mix things up most easily. Python is not an OS, and C is not a CPU. A language is a translation layer that organizes your ideas into something machines can run.
Once this position is clear, terms like “system error,” “interpreter version,” and “architecture compatibility” stop feeling like one tangled ball.
1.4 Core Programming Concepts: Flow, Script, Variables, Coding
A grounded example: batch-renaming images in your Downloads folder. First locate the target directory, then filter .jpg / .png, then define sorting and naming rules, and finally log failed items and retry.
You’ll notice what matters is process design, not how many syntax tricks you memorized. That’s algorithmic thinking. Language is a tool; process is the core.
What is a script?
A script is a small program for a specific task. The point is reducing repetitive work.
Things like organizing your Downloads folder, batch-renaming files, and auto-summarizing text are all script-friendly. It doesn’t have to be complex to be very practical.
What is a variable?
A variable is a name for data. Good names make code readable even days later; random names make code turn into riddles quickly.
If you’re counting images, image_count needs no explanation. If you call it a1, even you may have to guess what it means after three days. I made this mistake when I first wrote scripts: the code ran, but a month later I didn’t even want to touch it.
Variables look small, but they directly affect readability and your debugging speed later.
What is coding?
From another angle, coding is not a typing competition. It’s organization ability. You’re breaking an idea into executable structure: where variables go, how flow moves, how functions split, how modules are separated. Here, “coding” means writing code and turning ideas into programs, not character encodings like UTF-8.
If the structure is clear, future changes are easier. If the structure is messy, every new feature hurts. It’s normal if this still feels vague now. Start from one rule: write code that you yourself can understand later.
1.5 English and Reading Errors: Important, But Don’t Panic
Don’t turn this into an anxiety competition. You don’t need to memorize a whole dictionary before learning programming. I don’t suggest you pause coding to formally “start learning English first”; learn while doing.
But one thing is practical: sooner or later you’ll read English errors, English docs, and English issues. Whether you can extract key information directly affects your debugging speed.
So the goal is not “perfect English.” The goal is: understand core technical words, and understand your own variable names and error messages.
1.6 Common Beginner Mistakes and Mindset
I’ve seen many beginners get stuck in similar places: memorizing syntax without building anything, watching videos without hands-on practice, stopping at the first error, treating AI as magic without verification, or endlessly “preparing” without starting. And for AI specifically, asking it to build a whole website when you don’t know your own requirements is like becoming a vague client; the result often won’t match what you want.
These are usually rhythm problems, not ability problems. Build one tiny runnable result first, then add complexity step by step. Your mindset gets much steadier that way.
Pick the route first, then install tools
Many beginners get stuck on environment setup before writing a single line of code.
I recommend deciding direction first: pick Python as your first language, then run the minimum loop: “write -> run -> fix.”
Once you feel “it runs,” tool details become much easier to digest. Next I’ll talk about language choice first, then environment setup.
2. C or Python?
I’ll give you a stable recommendation here: learn Python first. Whether you’re from humanities, science/engineering, changing careers, or still in school, Python is usually the easiest way to build early positive feedback.
2.1 Why Start with Python
Python’s biggest advantage is fast feedback. You write a few lines and see a result immediately. That’s huge for beginners, because you keep getting the feeling that “I’m actually moving forward.” If you get timely positive feedback while learning, you’re more likely to stay interested and improve faster. I don’t want your first experience to be pure frustration from starting too hard.
Its syntax is also more intuitive, and its resources/community are mature. When you hit problems, there are usually workable answers. I’ve seen many beginners quit not because coding is impossible, but because they get no positive feedback for too long. Python is genuinely friendlier here.
2.2 Python in 10 Minutes (Up to Loops)
Let’s define scope first: this part only takes you up to loops, enough to run your first small program. Functions, lists, dicts, and file operations are intentionally not expanded here. You can verify this later after finishing environment setup, or skip to 2.4 for now.
Think of variables as “naming data.” Clear names make code easier to read.
name = "Dan"
age = 18
print(name, age)
After running, you should see one line like Dan 18.
print() outputs, input() takes input. input() returns a string, so convert with int() before numeric operations.
age = int(input("请输入你的年龄:"))
print("明年你是", age + 1, "岁")
After running, enter a number and you’ll see “next year you are xx years old.”
if is conditional branching: only execute that branch when the condition is met.
score = 72
if score >= 60:
    print("及格")
else:
    print("再练练")
After running, you’ll see Pass (because the example score is 72).
for is commonly used for fixed-count repetition. range(5) is 0 to 4; range(1, 6) is 1 to 5.
for i in range(1, 6):
    print(i)
After running, it prints 1 through 5 line by line.
while is for “keep looping while condition is true.” For example, accumulate until reaching 100:
total = 0
n = 1
while total < 100:
    total += n
    n += 1
print(total, n - 1)
After running, it prints the accumulated result and the last added number (something like 105 14).
2.3 Self-Learning Entry and Mini Exercises
Once you can handle loops, you have enough to start. For functions, lists, dicts, files, and modules, learn them next by yourself. The core isn’t “memorize everything”; it’s learning to search, read docs, and verify outputs.
A good place to start is Runoob: https://www.runoob.com/. When you meet new syntax, don’t rush to memorize. Run a minimal example first and see exactly what it does.
Here’s one mini exercise. Get a working result first, then optimize gradually:
- Narcissistic numbers (also called Armstrong numbers): for an n-digit number, the sum of each digit to the power of n equals the number itself. For 3-digit numbers, it means the sum of cubes of each digit equals the original number. I want you to find all narcissistic numbers in
100~999.
Hint: split into hundreds/tens/ones, cube each digit, compare with the original number.
2.4 Python Use Cases and Language Comparison
Its use cases are broad. In humanities, you can do text analysis, spreadsheet cleaning, and visualization. In economics/finance, common tasks include indicator calculations and report automation. In geography, you can process cloud maps and spatial data. On the science/engineering side, it’s great for experiment data cleaning, batch plotting, parameter scanning, and simple numerical computation. Move one step further and you’ll see it in automation scripts, web backends, AI preprocessing, and training scripts. You don’t need to master all of this at once. Build one small result in the scenario you care about most first; your learning speed will be much higher.
Python vs C: a minimal example
Same goal: print 1 to 5.
Python:
for i in range(1, 6):
    print(i)
C:
#include <stdio.h>

int main() {
    for (int i = 1; i <= 5; i++) {
        printf("%d\n", i);
    }
    return 0;
}
This example isn’t to say one language is “more advanced.” It’s just to show entry friction differences directly.
2.5 Should You Learn C Later?
Should you learn it? Depends on your direction. Build programming intuition with Python first. If you later move into systems, performance, or low-level work, adding C becomes much smoother.
A minimal starter route
- Learn Python basics first (variables, branching, loops, functions).
- Build one runnable script (for example, batch rename).
- When you hit errors, search, fix, and rerun.
Run this route once, and your foundation is stable.
3. Development Environment Setup
3.1 Editors and IDEs: Why Start with VS Code
If you’re just starting, I’d suggest Visual Studio Code first.
Let’s define IDE quickly. IDE (Integrated Development Environment) is like an all-in-one toolkit: editor, debugger, runner, project management, and so on. PyCharm and Visual Studio are typical IDEs.
I don’t recommend heavy IDEs on day one, not because they’re bad, but because too many features can distract you from the core question: “How does code actually run?” At the beginning, understanding that baseline flow matters more.
VS Code sits between a plain editor and a heavy IDE: lightweight by default, expandable when needed, enough without overload. That balance is very beginner-friendly.
The reasons are practical: cross-language support, mature extension ecosystem, usable integrated terminal, and handy Git integration. One unified toolchain means less mental load early on.
I got stuck during my first setup too. So many options on screen felt overwhelming. That’s normal. Get the toolchain running first; tune habits later.
Official site: https://code.visualstudio.com/.
Install the minimum set of extensions first; enough is enough:
Python(ms-python.python)Pylance(ms-python.vscode-pylance)Markdown All in One(yzhang.markdown-all-in-one)GitLens(eamodio.gitlens, optional)
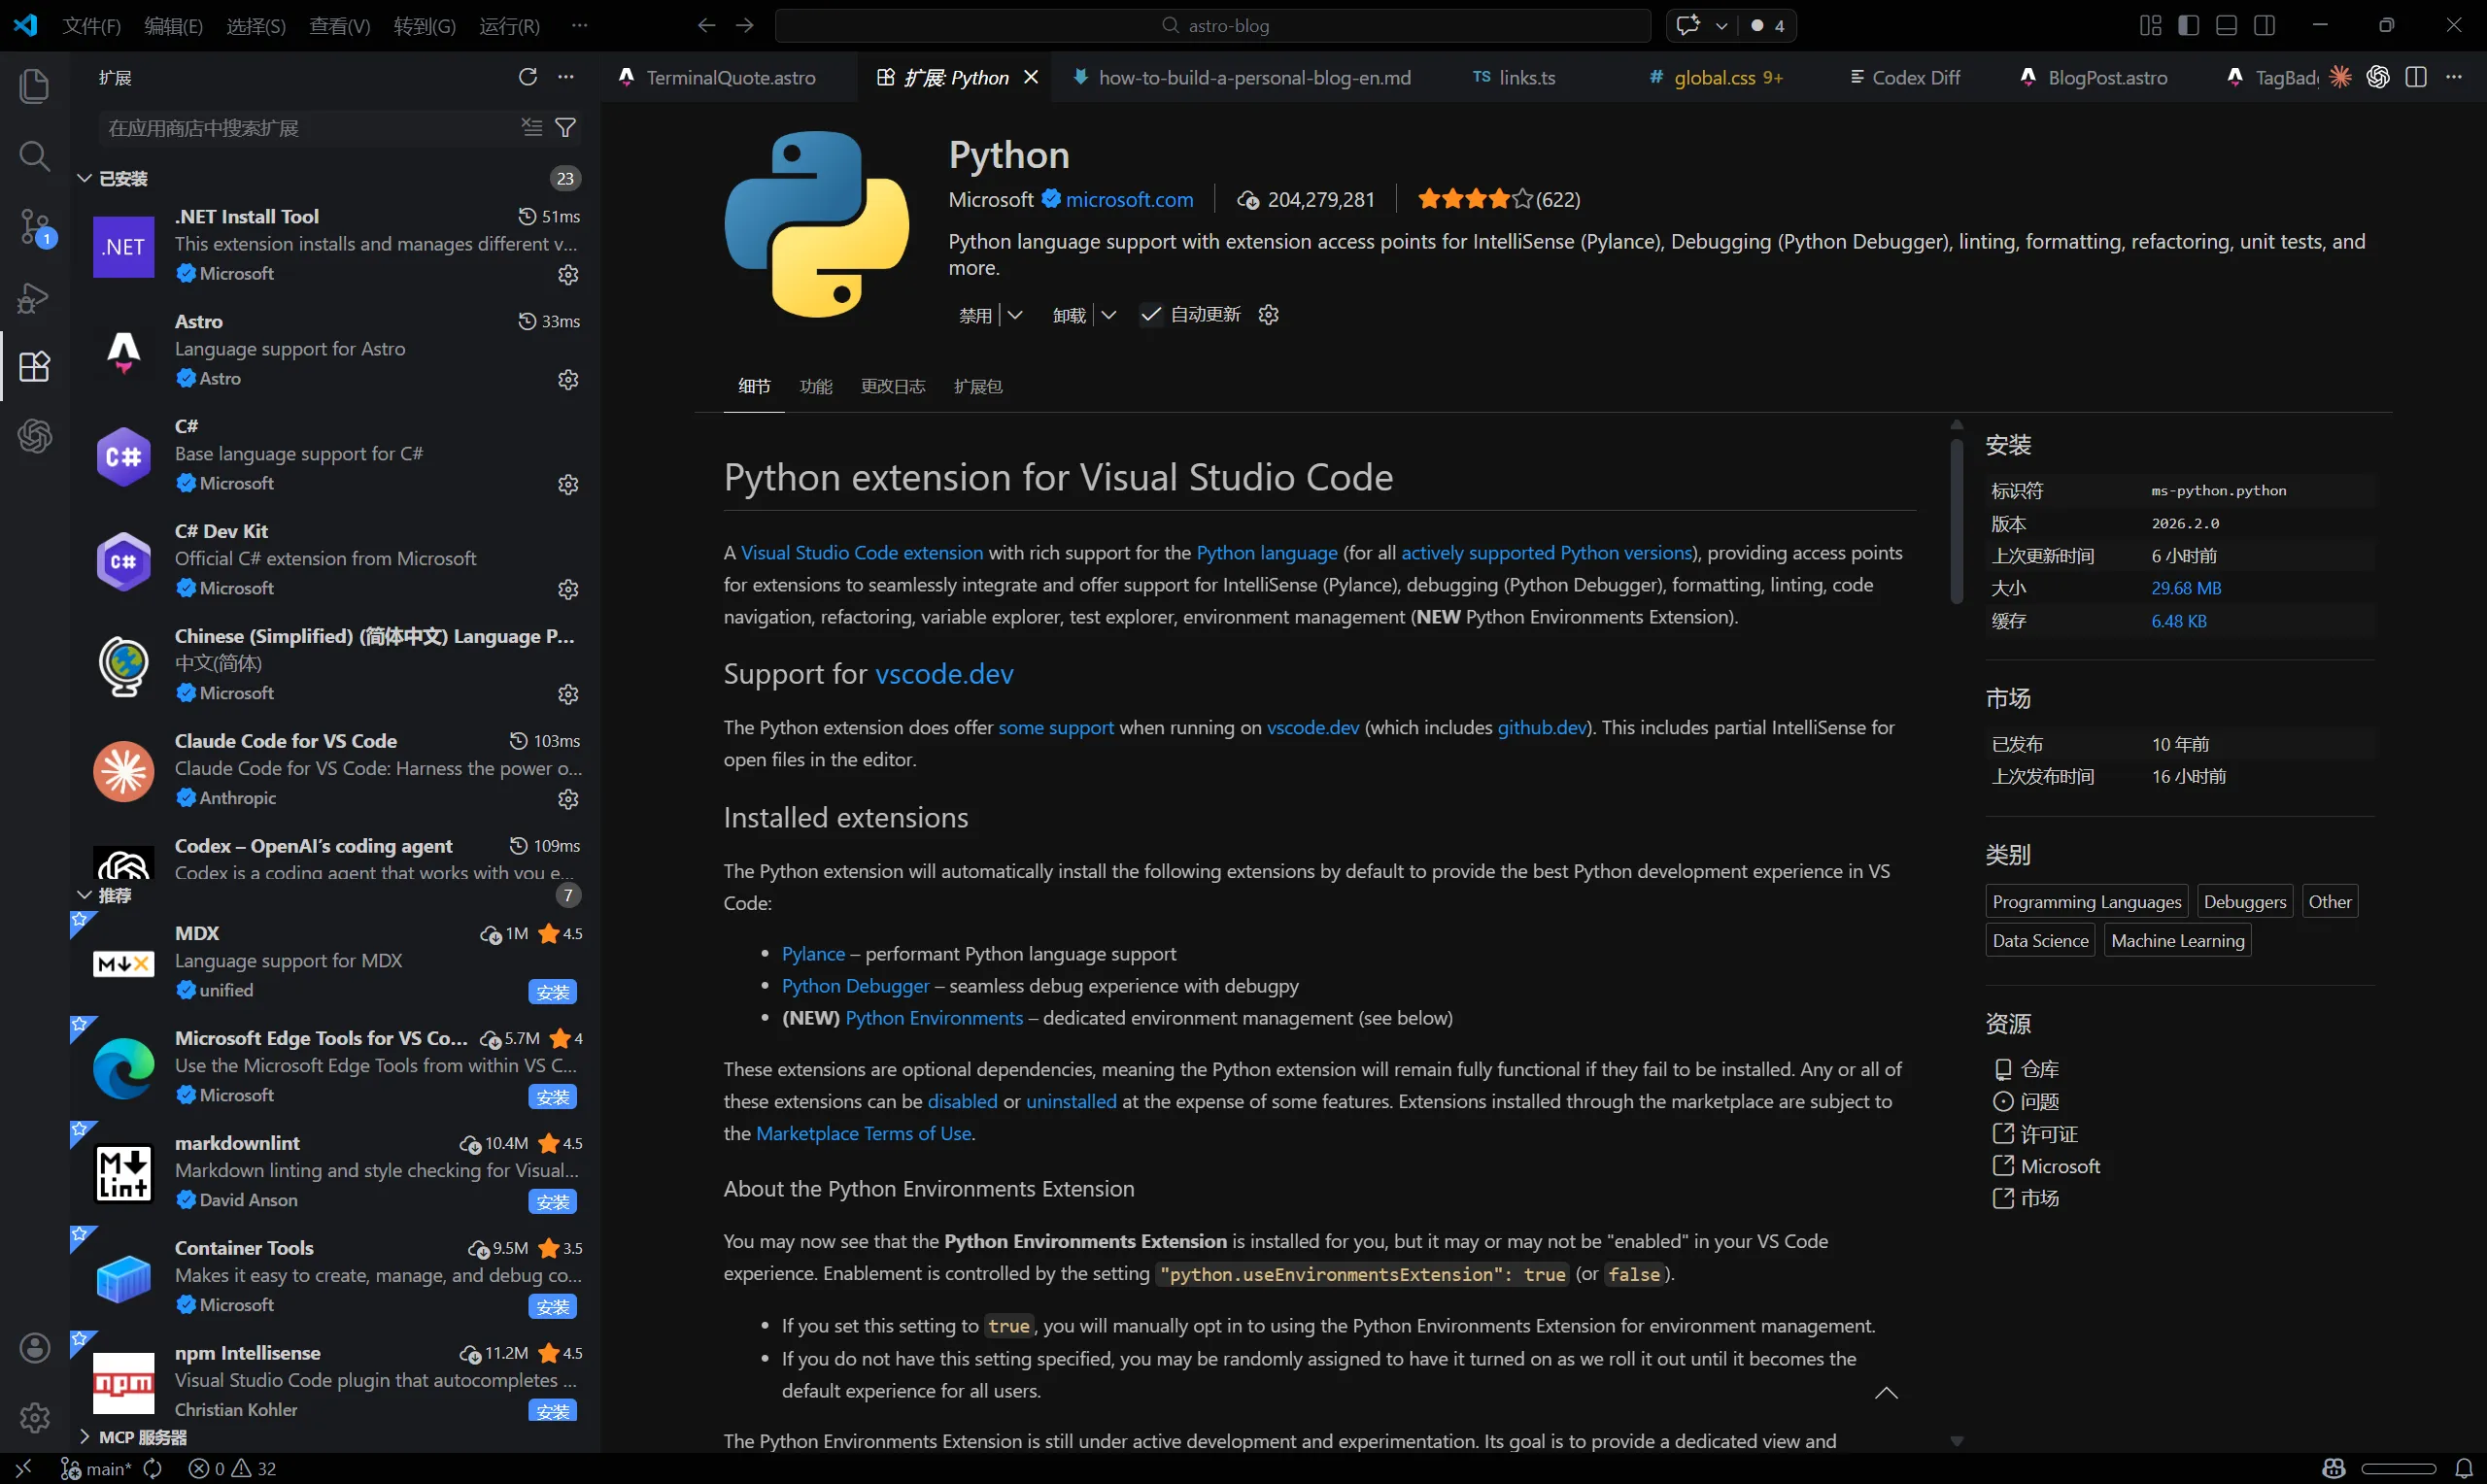
3.2 Python Extension and Interpreter: What VS Code Actually Does
This part confuses beginners easily. The Python and Pylance extensions mainly provide editor features: syntax highlighting, completion, jump-to-definition, type hints, debugging entry, etc.
They make writing smoother, but they are not the Python interpreter itself. The key sentence again: installing Python extension in VS Code does not mean Python is installed on your computer.
One layer deeper: VS Code is mostly your “write code and organize projects” workstation, not the runtime itself. It can call your system terminal, interpreter, and Git, but it does not install Python for you. Whether python runs in VS Code depends on whether your system has a usable interpreter and correct path config.
The Select Interpreter action in VS Code is basically telling the editor which Python on your machine this project should use.
Try this once directly: open VS Code, press Ctrl + Shift + P, type Python: Select Interpreter, then choose the learn environment you created. If you pick the wrong one, VS Code may run a different Python than the one you just installed.
After selecting correctly, the status bar usually shows the current Python environment/version (position may vary by theme). That’s the most direct success signal.
3.3 VS Code Installation, Chinese Language Pack, and Extensions
Start with the safest path. Don’t tweak too many options at first.
- Go to the VS Code site and download the Windows installer.
You should see a clearDownload for Windowsbutton. - During installation, recommended options:
Add to PATHOpen with Code- (optional)
Register Code as an editor for supported file types
- Launch VS Code after installation.
You should see the left activity bar (Explorer/Search/Source Control/Run/Extensions). - Open Extensions (the square icon), search and install the Simplified Chinese pack:
Chinese (Simplified) Language Pack for Visual Studio Code(official Microsoft pack). - Restart VS Code when prompted.
After restart, UI should switch to Chinese (if not, manually switch display language in Command Palette). - If you prefer Traditional Chinese, there’s also:
Chinese (Traditional) Language Pack for Visual Studio Code. - Do three things on first launch:
- Switch UI language to what you’re comfortable with.
- Install the minimal extension list above.
- Press
Ctrl + ~to open terminal and confirm commands can be entered normally.
Windows users can skip this short part:
VS Code also provides a macOS build at https://code.visualstudio.com/.
After install, open it directly; extension logic and interpreter selection are basically the same as on Windows.
What is a development environment?
Think of it as your programming workbench. The editor is for writing code, interpreter/compiler turns code into runnable behavior, and terminal is where you run commands and execute programs.
Package managers (like pip, conda) install and manage dependencies, while runtime defines what conditions your code runs under. You don’t need to master everything at once; it’s enough to know these parts work together.
3.4 Terminal and Win+R: Get Command Line Running First
What are CMD, PowerShell, and VS Code terminal exactly?
At first the black window may feel scary, but it’s just a place to type commands.
They’re all command-line entry points. CMD is simpler and easier to start with. PowerShell is more powerful. VS Code Terminal is basically one of these embedded in your editor so you switch fewer windows.
Pick one first. I suggest CMD.
Memorize a few core commands first: cd to change directory, dir to list files, mkdir to create directory, rmdir to remove empty directory, echo to output text, cls to clear screen.
Try this 3-minute exercise (copy-paste ready):
mkdir "%USERPROFILE%\Desktop\learning"  # 创建 learning 文件夹
cd /d "%USERPROFILE%\Desktop\learning"  # 进入 learning 文件夹(/d 支持切换盘符)
echo Hello Programming > hello.txt      # 创建并写入 hello.txt
dir                                     # 查看当前目录内容
type hello.txt                          # 查看文件内容
mkdir temp                              # 创建 temp 子文件夹
rmdir temp                              # 删除空的 temp 子文件夹
cls                                     # 清空终端屏幕
You will most likely see: after dir, hello.txt appears in the list; after type hello.txt, output is Hello Programming.
Two common pitfalls: forgetting cd /d so drive letter doesn’t switch; or creating files before entering learning, so files appear elsewhere.
If you understand what each command does, you’ve cleared the first terminal hurdle.
How to open system command line (Win + R)
If you’re not inside VS Code, open system command line directly: press Win + R, type cmd, press Enter.
After opening, you’ll usually see a prompt like C:\Users\your-username>. That’s your current directory.
If you accidentally open PowerShell, no need to panic. Most basic commands still work. Getting the workflow running matters most.
The terminal at the bottom of VS Code is essentially the same command-line environment embedded in the editor. Many commands follow the exact same logic.
Mac users can skip this Windows part:
On Mac, open Terminal (search Terminal with Spotlight).
Most commands are similar; Windows commonly uses cmd, Mac commonly uses bash/zsh.
3.5 Python Runtime, Miniconda, and Installation Route
I recommend Miniconda. Maybe Anaconda can be better in some cases, but I still hope you get familiar with terminal operations.
I still recommend Miniconda because it’s lightweight, controllable, and great for environment isolation.
Miniconda official download page: https://docs.conda.io/en/latest/miniconda.html.
Remember three words first: Python version (e.g. 3.10, 3.11), packages (third-party libraries like requests), and virtual environment (each project uses its own dependencies without conflicts).
Where is Python actually installed?
There are two common ways to install Python. One is direct install from the official Python site: https://www.python.org/. The other is installing Miniconda, which also includes its own Python.
Both ways work. Pick one. For beginners, I recommend starting with Miniconda to save trouble when you isolate environments later.
One more time for the most common misunderstanding: installing Python extension in VS Code does not mean Python is installed on your computer.
How to confirm Python is really installed
After installation, run this minimum check first:
python --version      # 查看 Python 版本
where python          # 查看 python 执行路径
Normally you’ll see something like Python 3.11.x, plus a python.exe path pointing to your Miniconda directory.
If python --version doesn’t respond or says command not found, PATH is usually not effective yet, or terminal session wasn’t refreshed. If where python points to a non-Miniconda path, you likely have multiple Python installs or PATH order is pointing to a different one first.
After changing PATH, remember to close all terminal windows and reopen.
If you can see both version and clear path, your runtime is basically ready. If not, don’t panic. Most of the time it’s just environment variables or terminal session not refreshed.
Use Tsinghua Mirror for Acceleration (Strongly recommended for users in mainland China)
Tsinghua open-source mirror: https://mirrors.tuna.tsinghua.edu.cn/. You can think of the “Tsinghua source” as a synchronized domestic mirror of official repositories. It’s not a modified fork; content still comes from upstream, just via a more stable local route.
If you’ve tried installing pandas or numpy in China, you’ve probably seen commands freeze for a long time. Often that’s not your code, just unstable default source connectivity. Switching to mirror usually makes downloads much smoother.
If you want to confirm paths yourself: open the mirror homepage, search anaconda, and you’ll find common channels. pkgs/main is core packages, pkgs/free is older compatibility packages, cloud/conda-forge is community-maintained packages with faster updates.
A channel is basically the repository list conda checks in order when resolving packages. Run the following in Miniconda Prompt, not plain CMD:
conda config --add channels https://mirrors.tuna.tsinghua.edu.cn/anaconda/pkgs/main/         # 添加主仓库镜像(常用基础包)
conda config --add channels https://mirrors.tuna.tsinghua.edu.cn/anaconda/pkgs/free/         # 添加历史仓库镜像(兼容旧依赖)
conda config --add channels https://mirrors.tuna.tsinghua.edu.cn/anaconda/cloud/conda-forge/ # 添加 conda-forge 镜像(社区包更全)
conda config --set show_channel_urls yes                                                      # 显示包来源通道,排错时更容易定位
pip uses official PyPI by default, which can also be slow on some domestic networks. Setting index-url becomes persistent:
pip config set global.index-url https://pypi.tuna.tsinghua.edu.cn/simple  # 设置 pip 默认镜像(持久生效)
pip config list                                                            # 查看配置是否生效
If you want to revert to default source later, run:
pip config unset global.index-url # 取消自定义镜像,恢复默认 PyPI3.6 Miniconda Installation and Verification Loop
I’ll split this into “domestic download” and “international download.” Follow it and you’ll close the loop.
Domestic users (Tsinghua mirror) download path
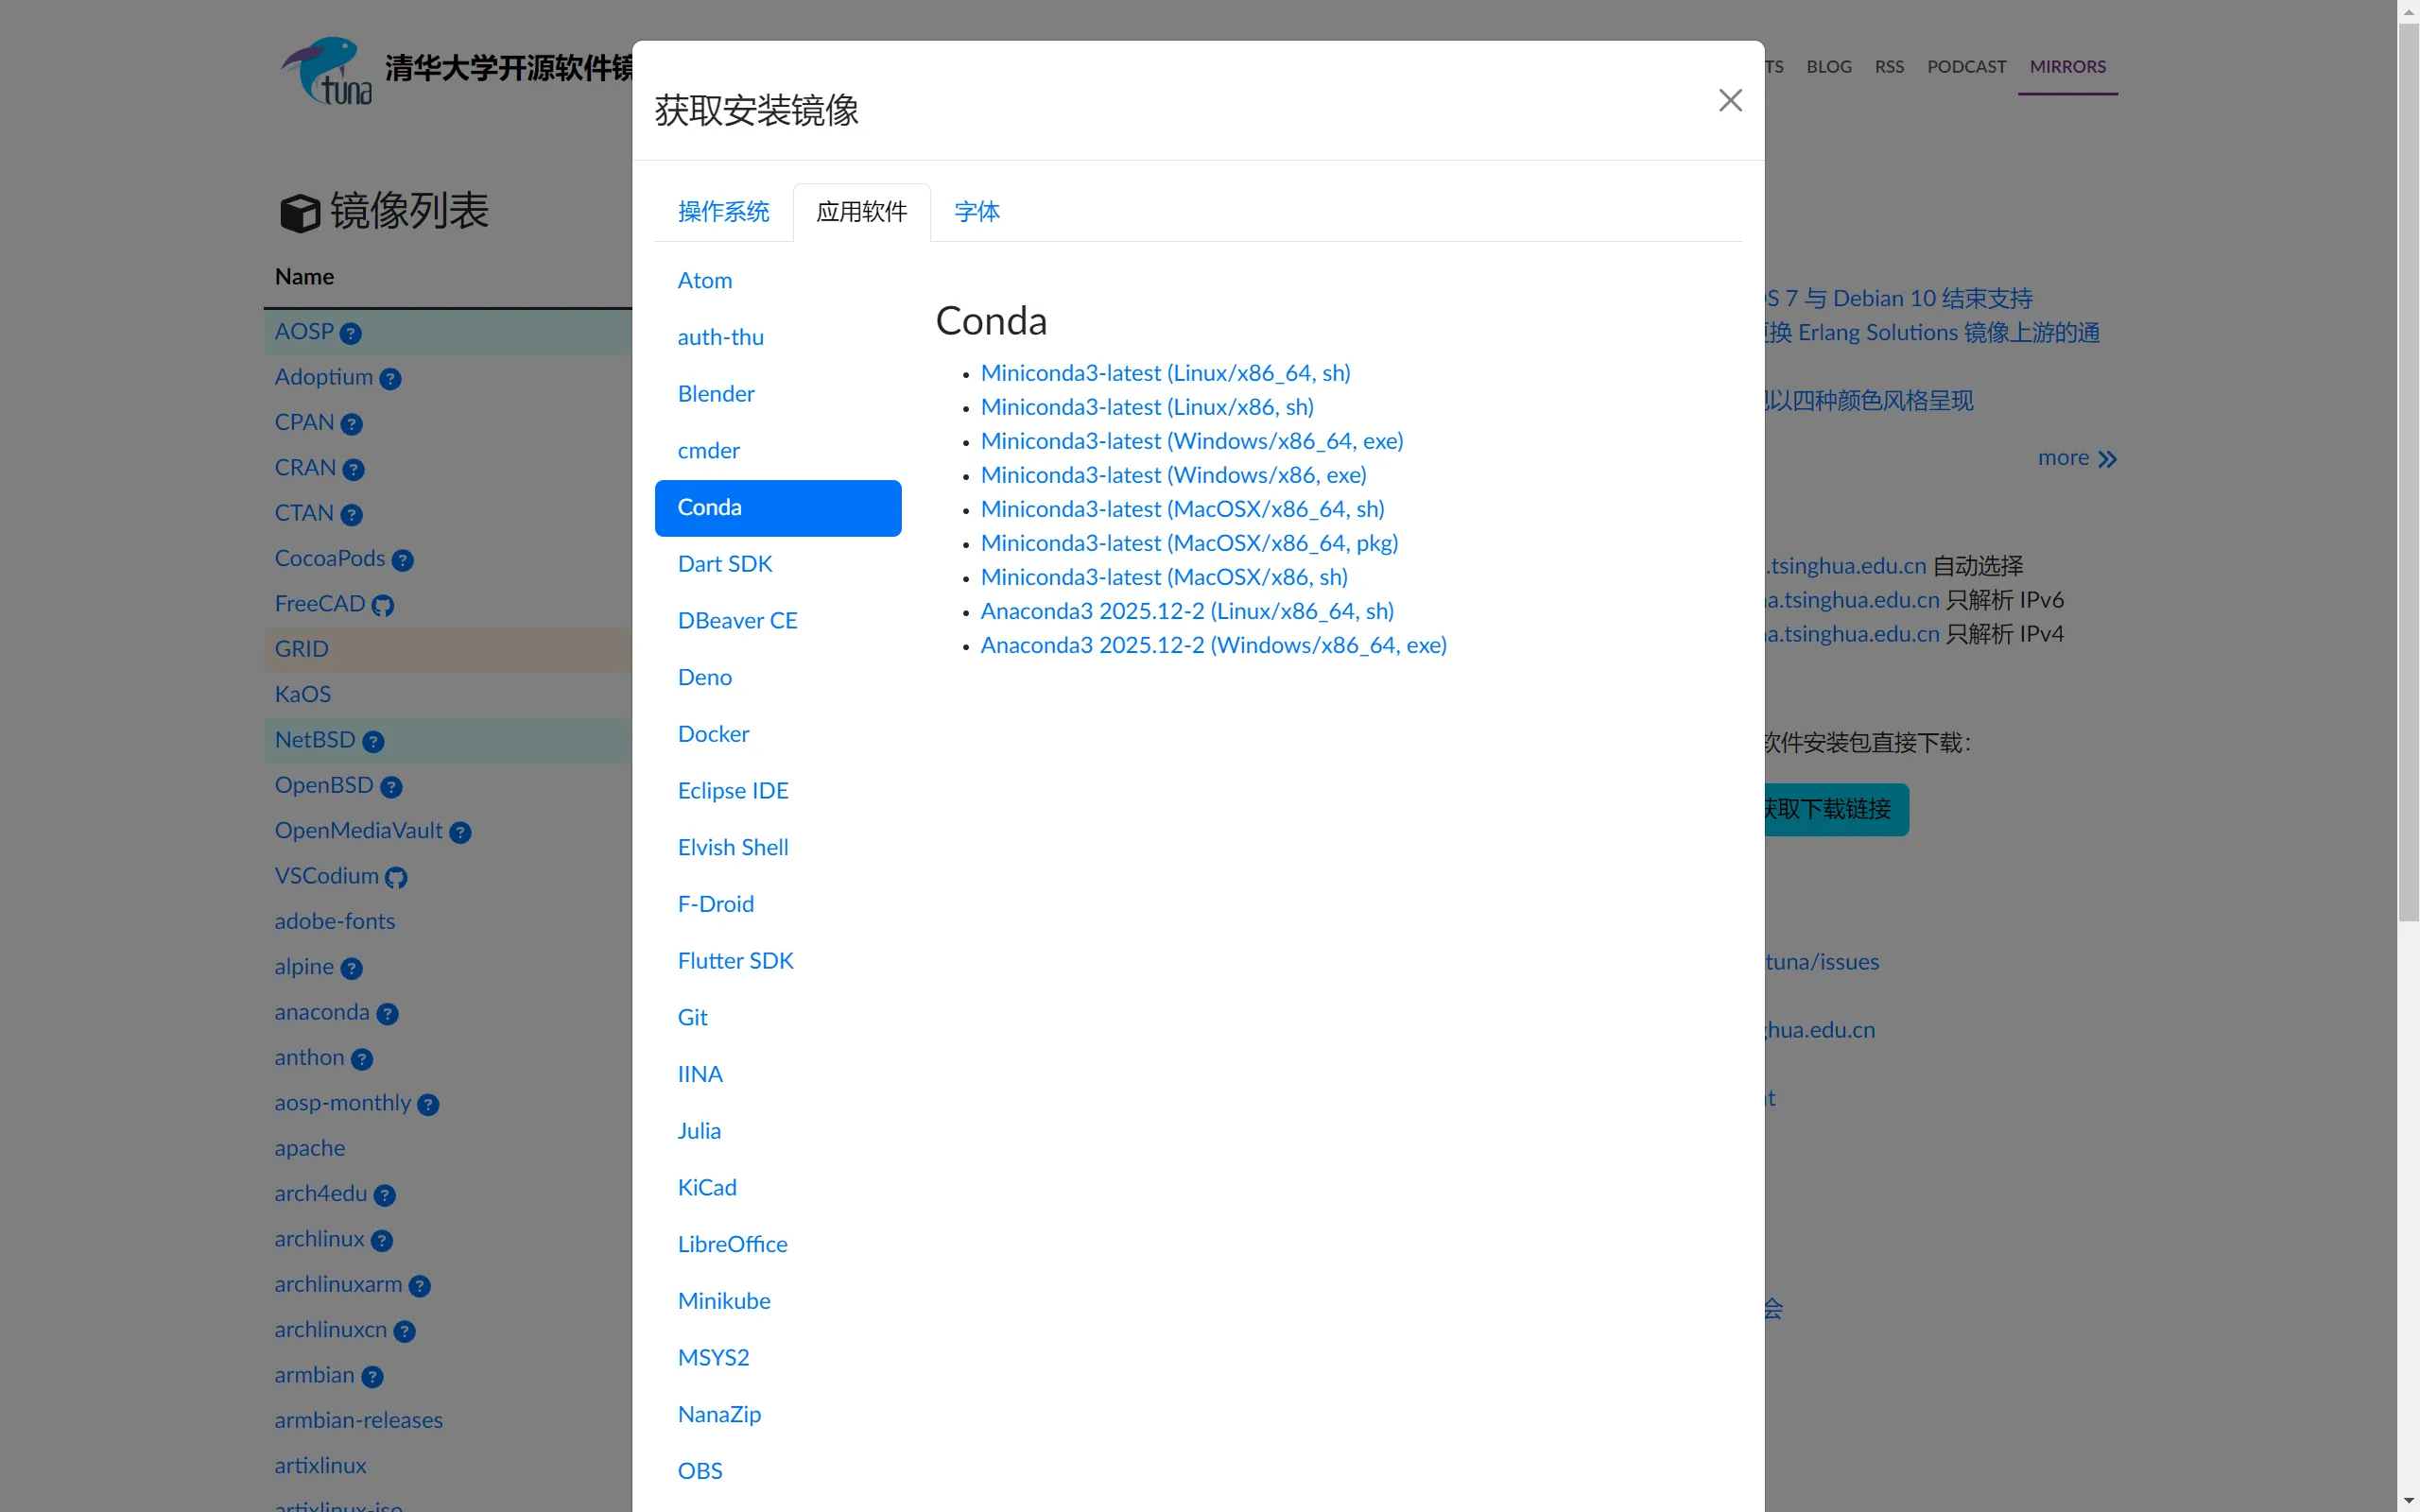
- Open https://mirrors.tuna.tsinghua.edu.cn/.
- On the homepage, look at the “download links” module on the right.
- Click the blue button “Get download links”.
- In the popup, switch to “Applications (or Application Software)” tab, select
Condaon the left, then chooseMiniconda3-latest (Windows/x86_64, exe)on the right. x86_64means 64-bit Windows, which is most computers; don’t select Linux.shor macOS.pkg.- Downloaded filename usually looks like
Miniconda3-latest-Windows-x86_64.exe; this format is normally correct. - Save the
.exeinstaller to an English-path directory (likeDownloads).
International users (official site) download path
- Open https://docs.conda.io/en/latest/miniconda.html.
- Find
Windows 64-bit Installer. - Download the corresponding
.exeinstaller.
Windows users can skip this short part:
Mac users can download macOS builds on the same page (choose Apple Silicon / Intel based on your device).
After installation, run conda --version in Terminal for a minimum verification.
After download, installation steps are:
- Double-click installer.
- For user scope,
Just Meis recommended (less permission issues on personal machines). - Installation path recommendation:
C:\Miniconda3; avoid Chinese path and spaces. Add Miniconda to PATH: if this is your first install, checking it is recommended sopythonandcondawork directly in CMD. If you later manage multiple Python versions, you can adopt stricter isolation workflows.Register Miniconda as default Pythonis recommended, so common tools prioritize this Python. If your existing projects depend on another Python, decide based on your situation.- After installation, search Start Menu and open
Miniconda Prompt.
If you don’t want to modify system PATH, you can leave it unchecked; but for beginners, checking it usually avoids more pitfalls. I’ll also show verification and manual handling below. Verify immediately after install
After installation, run these three commands in Miniconda Prompt:
conda --version              # 确认 conda 可用
python --version             # 确认 Python 可用(来自 Miniconda)
where python                 # 确认 python 路径指向 Miniconda 目录
conda --versionshould output something likeconda 24.x.xpython --versionshould output something likePython 3.11.x- first path in
where pythonusually should point toC:\Miniconda3\python.exe(or your own Miniconda directory) where pythonmay print multiple lines; the first line is the currently prioritized Python.
3.7 PATH Environment Variable: Manual Handling When You Don’t Check It
This sounds very “system settings” at first, but once you do it once, it becomes easy.
- Right-click “This PC” on desktop or in Explorer.
- Click “Properties”.
- Click “Advanced system settings”.
- In the popup, click “Environment Variables”.
- In “System variables”, find
Path. - Click “Edit”.
- Click “New”.
- Add your Miniconda directory, e.g.
C:\Miniconda3. - Click “New” again and add
C:\Miniconda3\Scripts. - Click “OK” all the way to save.
- Close all opened terminals, then reopen.
You can think of PATH as the system’s “search directory list” for executables. When you type python in cmd, Windows checks this list top-to-bottom to find python.exe. If the directory isn’t listed, command line will say it can’t find Python.
Why reopen terminal? Because terminal reads an environment snapshot when it launches. If you change PATH later, old windows won’t auto-refresh; only new windows read the new values.
How to verify PATH is effective
After configuration, check immediately:
where python   # 查看 python 实际命中路径
echo %PATH%    # 打印当前 PATH 列表,确认是否包含 Miniconda 目录
If where python shows your newly configured path, it’s basically effective.
3.8 Create the learn Environment and Common Pitfalls
Run these in Miniconda Prompt:
conda create -n learn python=3.11  # 创建名为 learn 的 Python 3.11 环境
conda activate learn               # 激活 learn 环境
python --version                   # 检查当前 Python 版本
pip install requests               # 在当前环境安装 requests 包
conda deactivate                   # 退出当前环境
After conda activate learn, you’ll usually see (learn) on the left side of prompt. That’s the most direct activation signal.
When you run conda create -n learn python=3.11 for the first time, you’ll usually see:
Proceed ([y]/n)?
Type y and press Enter to continue.
If pip install requests times out or is very slow, go back to the Tsinghua mirror section above and check if mirror configuration is effective.
Another common pitfall: installing packages without activating target environment first. Then packages may go into base or system environment, and when you switch environment later you’ll get ModuleNotFoundError.
If this command set runs through, you’ve finished your first usable dev environment.
If you run into these cases:
pythonis not recognized as an internal or external command
Usually PATH is not configured correctly, or you didn’t reopen terminal after changing PATH. Fastest check:where python, then reopen terminal.where pythonpoints somewhere else
You probably have multiple Python installs and current one is not the one you expect. Fastest fix: adjust PATH order, or explicitly useC:\Miniconda3\python.exe.condais not a command
You’re most likely not in Miniconda Prompt. Fastest fix: open Miniconda Prompt and run again.ModuleNotFoundError
Confirm VS Code interpreter matches your active environment, then runpip installinside that same environment.
Pitfalls you’ll likely hit
Most common ones: python not recognized, multiple Python installs with unclear active one, or pip installing into system env instead of project env.
Many beginners go through this stage. You might run conda activate learn and feel like “nothing happened”. Usually command isn’t broken; either conda wasn’t loaded in this terminal, or you’re not using Miniconda Prompt.
I hit this too. Looking back, most issues came from path and environment not aligned. Use these two commands to make current state explicit:
conda info --envs  # 查看所有 conda 环境,以及当前激活环境
where python       # 查看当前 python 命令实际指向的可执行路径
conda info --envs confirms which environment is active; where python confirms which executable is actually called.
If output still looks confusing, that’s normal. Just confirm two things first:
(1) are you in learn environment, and (2) does first line of where python match the Python you intended.
4. Version Control
4.1 Why You Need Version Control
You’ve probably seen this: desktop full of final.py, final_final.py, final_final_v3.py, and a week later you can’t tell which one actually runs. That’s where version control matters: it records each change as a timeline, so you can review, rollback, and collaborate.
What is Git (one sentence)
Git is a local version control toolset that records code history and changes.
4.2 Git Installation and Basic Setup (Windows Mainline + Mac Side Note)
Start at Git official site: https://git-scm.com/. Windows users click Download for Windows (or equivalent), then run installer (filename usually like Git-2.xx.x-64-bit.exe).
Installer has many pages. Here’s the beginner-focused pass through key options:
License: clickNext.
This page is just licensing text.Select Destination Location: default is fine.
If changing path, prefer English path likeD:\GitorC:\Program Files\Git.Select Components: mostly default, focus on key options.
Git Bash Hererecommended;Git GUI Hereoptional;Git LFSrecommended;Associate .git* configuration files with the default text editorrecommended;Associate .sh files to be run with Bashoptional;Add a Git Bash Profile to Windows Terminaloptional.Start Menu Folder: defaultNext.
No need to tweak this page as a beginner.Choosing the default editor used by Git:
If VS Code is installed, chooseUse Visual Studio Code as Git's default editor; otherwise default is fine and can be changed later.Adjusting the name of the initial branch in new repositories:
Recommended:Override the default branch name for new repositoriesand set tomain.Adjusting your PATH environment:
Beginner recommendation:Git from the command line and also from 3rd-party software, so git works in CMD/PowerShell/VS Code terminal.Choosing the SSH executableandChoosing HTTPS transport backend:
Keep defaults (usuallyUse bundled OpenSSH/Use the OpenSSL library).Configuring the line ending conversions:
Recommended:Checkout Windows-style, commit Unix-style line endings, to avoid full-file line ending diffs cross-platform.Configuring the terminal emulator to use with Git Bash:
Keep defaultUse MinTTY; doesn’t conflict with daily use in VS Code terminal.Choosing the default behavior of 'git pull',credential helper,extra/experimental options:
Keep defaults for now (Git Credential Managershould stay enabled).
After install, close all terminal windows and reopen. Then in CMD (Win + R, type cmd) run:
git --version # 正常会看到:git version 2.xx.xIf it says git is not a command: reopen terminal once first; if still broken, reinstall and make sure PATH page selected “from the command line and also from 3rd-party software.”
Mac side note (Windows users can skip): run git --version in Terminal. It usually prompts to install command line tools. Follow wizard, then reopen Terminal and verify again.
First Git basic config (user.name / user.email)
This sets commit identity, not account password. Configure once and commit records become stable.
git config --global user.name "你的名字"          # 设置提交显示名
git config --global user.email "[email protected]" # 设置提交邮箱
git config --global --list                        # 验证配置
You should see user.name= and user.email= lines, meaning configuration is active.
4.3 GitHub Registration and Account Preparation
Git is local version control; GitHub is remote hosting and collaboration. One records versions locally, the other puts versions online and supports collaboration.
GitHub official site: https://github.com/.
For beginners, GitHub’s biggest value is making learning visible. What you built and how you improved are recorded. Others can see it, and you can review it yourself. It’s also great for learning repository structure, README style, and issue-writing patterns from others.
4.4 GitHub Web Quickstart: Interface, New Repo, First Commit
GitHub UI is English by default, which is normal. Don’t panic. As a beginner, recognize core buttons first and everything gets easier.
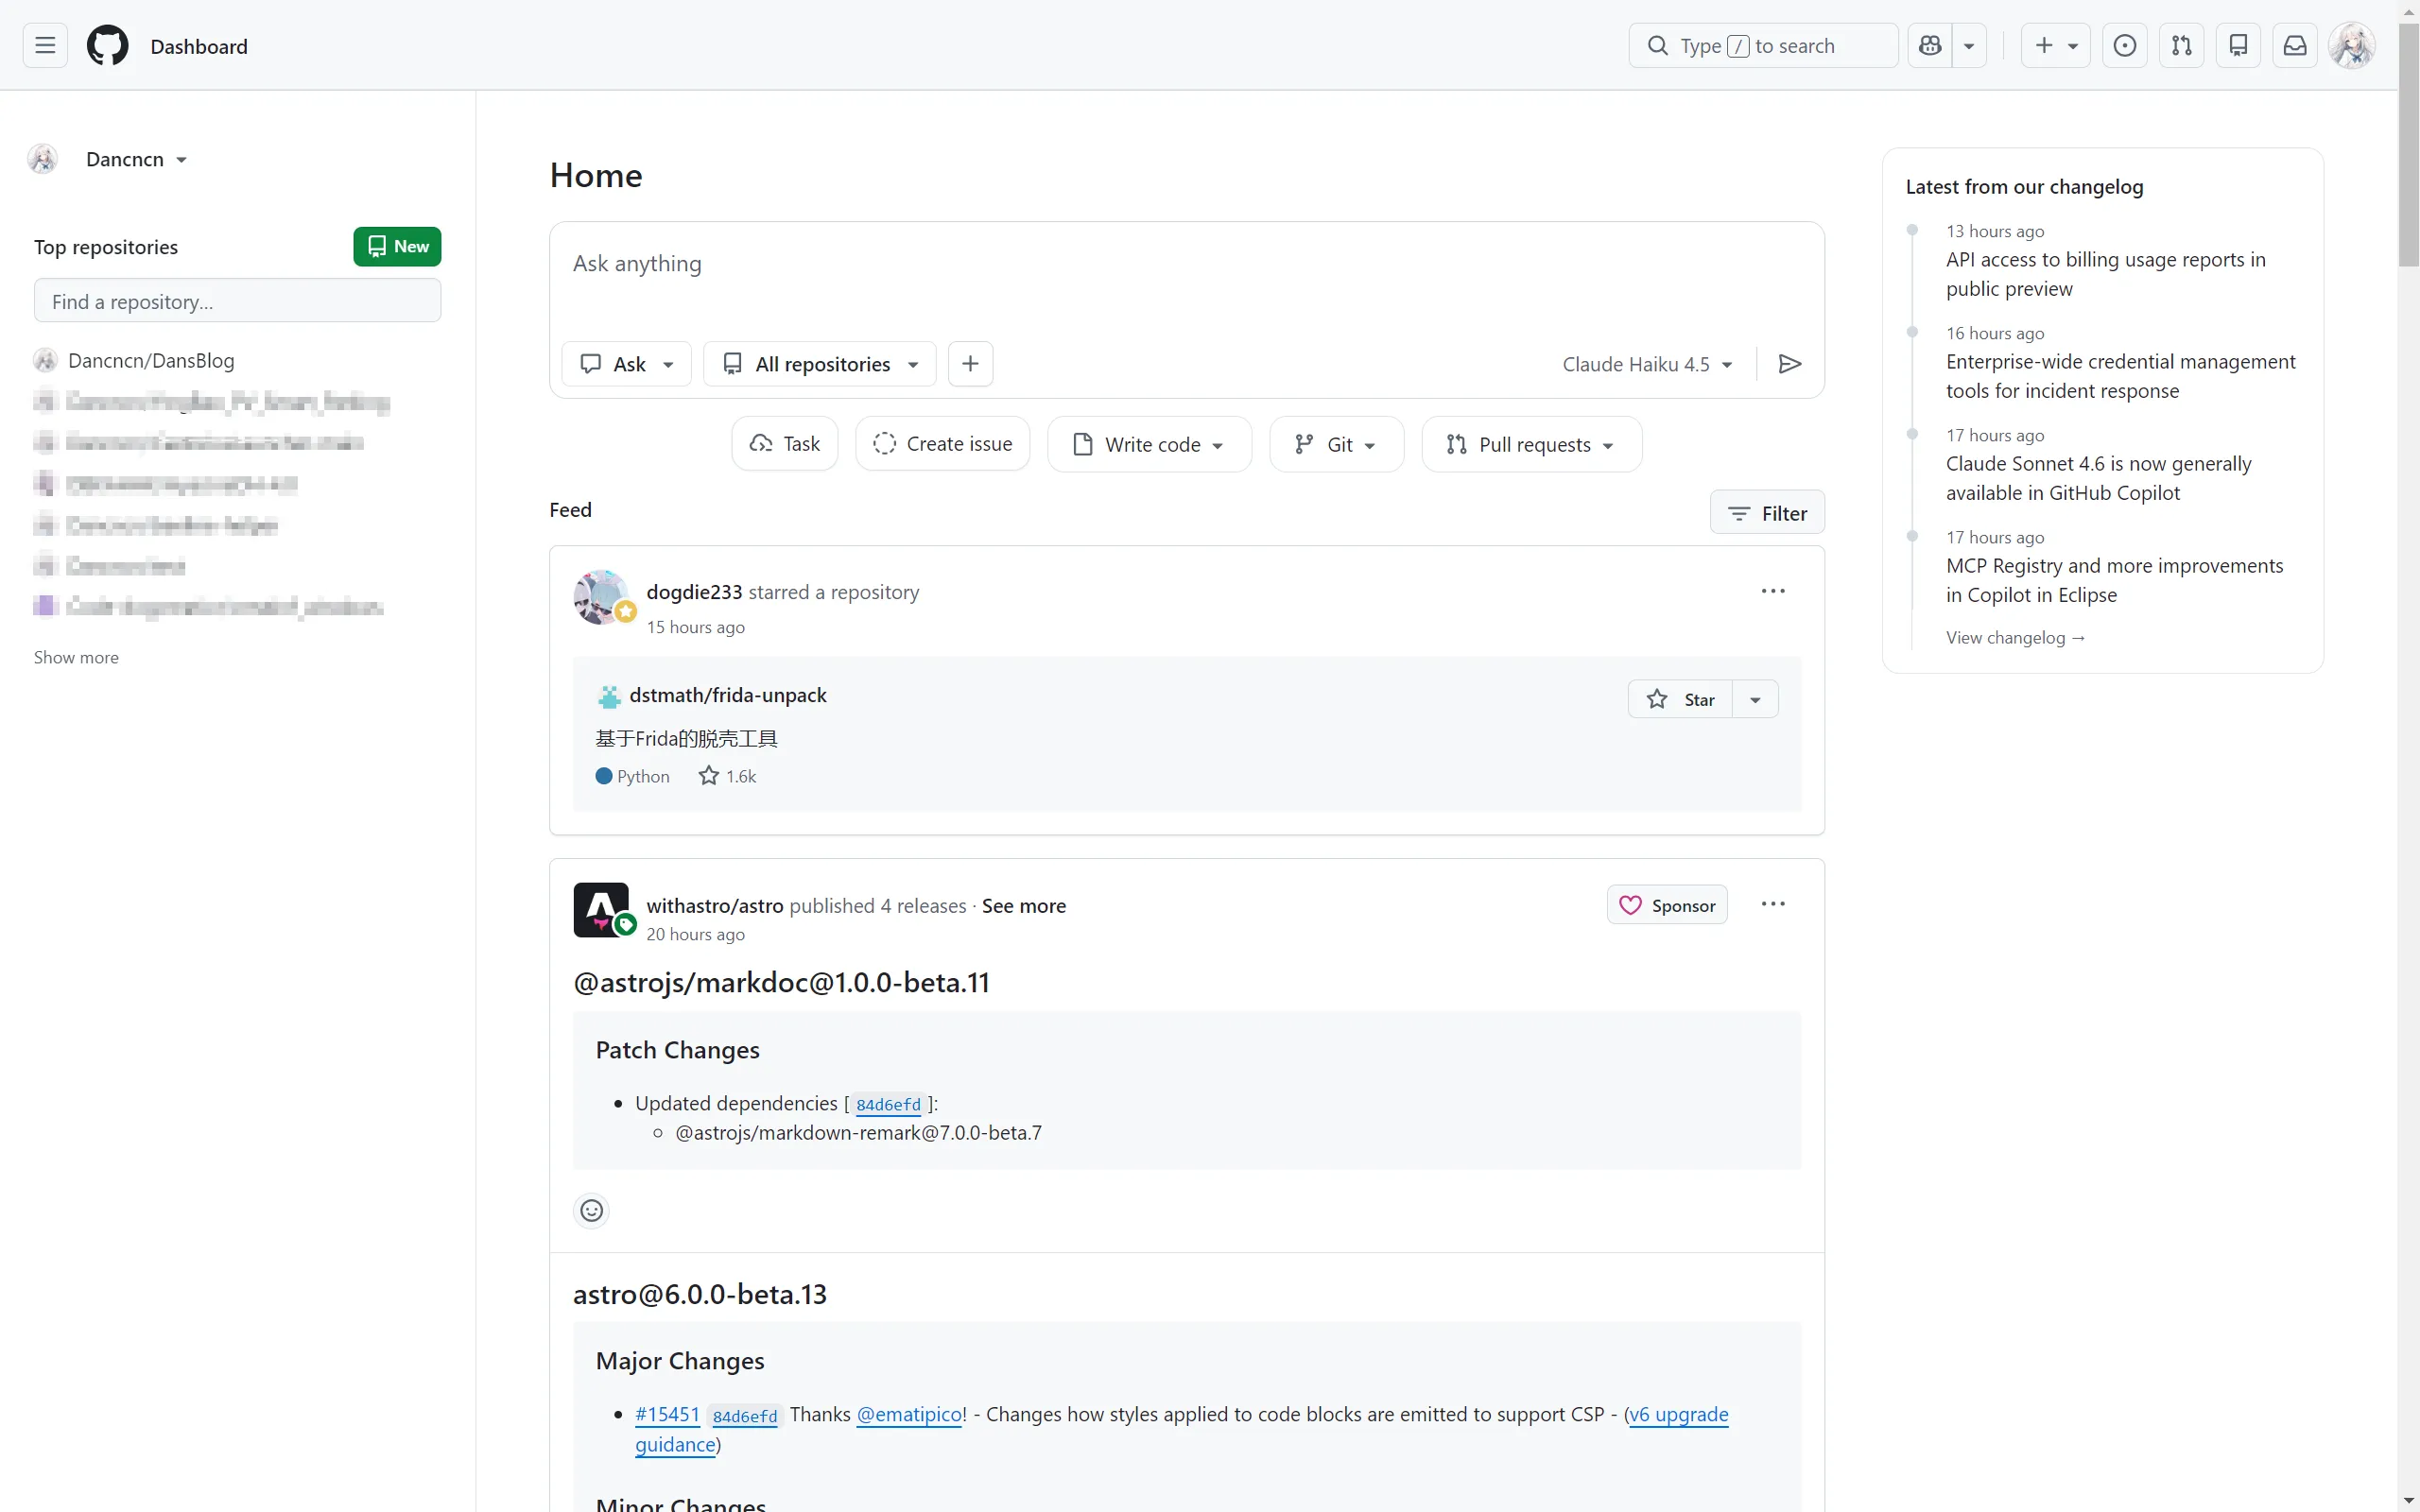
After logging into https://github.com/, you’ll usually land on Dashboard / Home.
You’ll usually see three things first: top search box, top-right avatar and + menu, and left-side repo area. UI may change slightly over time, but core entries are stable: avatar, +, Repositories, Settings.
These areas are enough to start:
- Left repo area (
Top repositories/Repositories): quick access to your repos. - Center feed: just know it exists for now.
- Top-right
+menu: most used item isNew repository. - Green
Newbutton on left Dashboard: also creates a repo.
In avatar menu, common entries are:
Your profile/Profile: your personal page.Your repositories/Repositories: your repo list.Settings: account settings (email/password/security, etc.).Sign out: sign out.
For your first time, knowing these entries is enough.
GitHub registration (step by step)
GitHub is mostly English UI. I don’t recommend relying entirely on translators from day one, but if you’re truly stuck, use translation temporarily and get through the flow first. Over time, build the habit of reading English buttons and errors directly.
Registration flow:
- Open https://github.com/, click
Sign upin top-right. - Fill
Email address,Password,Usernamein order. - Complete
Verify your accountand email verification code. - After completion, you’ll enter homepage and usually see your avatar or
+menu on top-right.
Common blockers:
Usernamealready taken: choose another one.- Verification email not received: check spam, wait a few minutes, or switch mailbox.
- Slow page loading: refresh or retry later; if it happens often, see optional section below.
Mailbox suggestions for GitHub registration
Domestic users can use QQ Mail or 163 Mail.
If you prefer international services, Gmail/Outlook are also fine.
There’s no hierarchy between mailbox providers. The important part is long-term stability, receiving verification codes, and your own convenience.
Same for English UI: don’t panic. Learn common buttons first; translate temporarily only when truly stuck.
Create a new repo on web (step by step)
Step 0: confirm login success.
You should see your avatar at top-right.
Step 1: enter creation page.
Entry A: top-right + -> New repository; Entry B: green New on left Dashboard.
You should arrive at Create a new repository page.
Step 2: fill Repository name.
Use English plus hyphen, e.g. project-hello.
When valid, you’ll usually get a green pass hint. If error appears, shorten name and keep to letters/numbers/hyphens.
Step 3: choose Public / Private.
Public is better for learning showcase; Private works as private draft notebook.
You should see your selected option highlighted.
Step 4: Add a README file is recommended.
Practical reason: non-empty repo, with an immediate readable entry point.
After checking it, the option should show enabled.
Step 5: .gitignore and License.
.gitignore can be skipped at first; if this is clearly a Python project, choose Python template.
If unsure about Choose a license, skip for now and add later.
Step 6: click Create repository.
After creation you’ll enter repo page on Code tab by default; if README was selected, you’ll see README.md in file list.
Common pitfalls:
- Duplicate/invalid repo name: switch to a different one (letters/numbers/hyphens are safest).
- Email not verified: some features may be restricted; verify email first.
- Slow page loading: if creation/loading pages get stuck often, check optional handling section later.
First web commit (without installing any tools)
If you don’t want to install tools yet, web flow can still complete your first commit and build confidence that “I can submit changes.”
Route 1: Add file -> Create new file
- Open repo
Codepage, clickAdd file->Create new file. - Use English filename like
notes.mdorhello.txt. - Write some content in editor.
- Scroll down to
Commit changes, fillCommit message(for exampleadd notes). - Click
Commit changes.
You should see: new file appears in list, and Commits count increases by one.
Route 2: Add file -> Upload files
- On
Codepage clickAdd file->Upload files. - Drag local
main.pyin (or click button to choose file). - Wait upload to finish, then scroll to
Commit changes. - Fill
Commit message(e.g.upload main.py) and clickCommit changes.
You should see: main.py appears in file list, and commit history has a new entry.
Web flow is great for small edits and temporary file updates. For long-term development, local workflow + Desktop is still more stable and efficient.
How to read a repo page (most-used parts on Code tab)
First time entering repo page, don’t read everything. Just walk through these areas:
- Top tabs:
Code/Issues/Pull requests/Actions/Settings.
Beginners can focus onCodefirst;Issuesis for questions/bug reports;Actionscan wait. Branchdropdown (usuallymain): branch switch entry.- Green
Codebutton: common options includeHTTPS/SSH/Download ZIP. Go to file: quick jump when repo has many files.Add file: create/upload entry.- File list (
src/,README.md, etc.): main project content. READMErenders in lower page area: first project description entry.Commits: change history timeline and per-commit details.
4.5 Git Workflow and Minimal Vocabulary
Start with five words: commit, push, pull, branch, merge. Daily flow is usually: change locally -> commit -> push; when syncing use pull; use branch for parallel work; merge with merge at the end. If conflicts happen, don’t panic, inspect both sides and decide what to keep.
Git in VS Code (short version)
The Source Control panel in VS Code can show diffs, stage files, write commit messages, and commit. Very handy for small daily edits.
But for beginners, using GitHub Desktop for push/publish is often more stable and more visual. Run through commit/push/pull with GUI first; command line can come later.
4.6 Optional Handling When Access Is Slow in Mainland China
Under domestic network conditions, GitHub may sometimes be slow in loading, login, or release downloads. Start with no-tool options first: try another time period, and prioritize sync via GitHub Desktop.
If you frequently get stuck on registration verification pages, login pages, or Desktop authorization callback, then consider this optional route.
If you need an optional network optimization tool, you can check Watt Toolkit (Steam++): https://steampp.net/. This is only a backup option, with no effect guarantees. Tools are just tools; don’t let them distract you from learning goals.
4.7 GitHub Desktop Workflow: From Sign-in Authorization to Publish
GitHub Desktop download: https://desktop.github.com/.
Do first-time sign-in/authorization once, then everything after becomes smoother:
- Open GitHub Desktop.
- On Windows usually go
File -> Options -> Accounts; on macOS usuallyGitHub Desktop -> Settings -> Accounts. - Click
Sign in, then follow browser authorization flow (you’ll usually seeAuthorize GitHub Desktopor similar). - After authorization, return to Desktop and confirm account is visible (avatar or username).
- If authorization page loads slowly, retry at another time first; if it still frequently blocks, see optional section above.
Expected result: File menu is available, and after one commit, Publish repository will appear.
Make sure you’re already signed into GitHub in Desktop (done above).
- Create a project folder
project-helloon desktop. - Open it in VS Code, create
main.py, and write:print("Hello from my first repo"). - In GitHub Desktop:
- If local folder is not a repository, use
File -> New repository.... - If it already is, use
File -> Add local repository....
- If local folder is not a repository, use
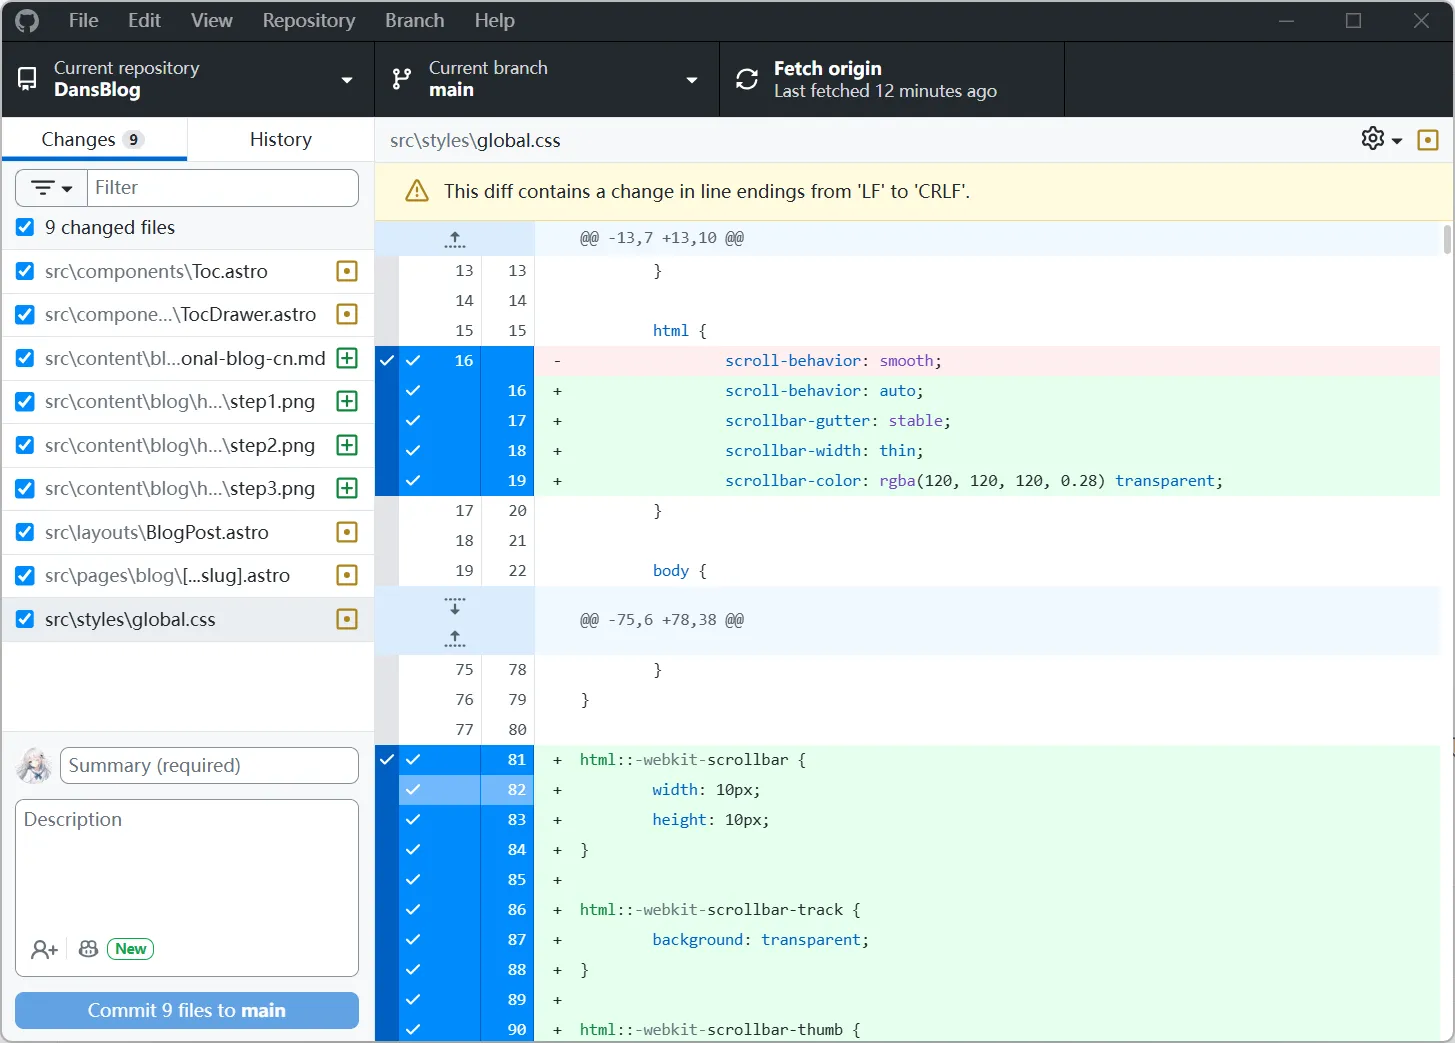
- Fill
Summaryin lower-left, clickCommit to main. - Click
Publish repository. - Go back to GitHub web and confirm repo is created and
main.pyis visible.
State checks after each step:
- After repo init/add, changed files appear on left list.
- After commit, changes list becomes empty.
- After publish, web repo is accessible.
If you get stuck:
Commitbutton is gray: usually file not saved or no changes made.Publishdoesn’t appear: check if you’re logged in.- Web page won’t open or loads very slowly: finish flow in Desktop first; consider optional tool above only if necessary.
Minimal Git vocabulary
repo means repository, commit is a snapshot, branch is a parallel line, merge combines branches, push/pull sync with remote, and clone copies remote repo to local.
5. In the AI Era, You Might Not Need to Write Every Line, But You Still Need Engineering Thinking
AI has made coding faster. That’s true. What hasn’t changed is this: to land projects, someone still has to clarify problems and make results reliable.
What I care about now isn’t how much syntax you memorized. It’s whether you can turn “looks like it works” into “stable and reproducible.” That’s where engineering ability lives.
Real scenarios are often plain. You copy a code snippet and immediately get ModuleNotFoundError. First check interpreter, then where python, then install dependencies into the current environment. Run again, now you get FileNotFoundError, then go back and check paths. Problems are peeled layer by layer, not solved by one magical answer.
The one sentence I want to keep is: “Code you don’t understand is still debt, even if AI wrote it beautifully.”
AI can do a lot: templates, ideas, error explanations, optimization suggestions. What it cannot do is understand your requirements for you, take responsibility for mistakes, or make long-term architecture tradeoffs for you.
No need to mythologize tool choices either. For beginners, Doubao and DeepSeek are fully enough to start. If you need stronger quality/context handling, then try ChatGPT, Gemini, or Claude.
Using Codex-like plugins in VS Code is also practical. Completion and explanations can speed you up. It can be a copilot, but you’re still holding the steering wheel.
I’ll end this part with one line: what you really need to train is turning chaos into clarity. Tools will change, methods will change, but the steering wheel stays in your hands.
I hope you can build one ability worth having in this era: finding problems and thinking through solutions. When you hit a problem, your first reaction shouldn’t be giving up, but asking “how can I solve this?” Once your brain has at least a rough map, go try. If this software isn’t available, where else can I get it? Has someone met the same issue before? Did they leave a solution? Can I learn from it?
People who do big things shouldn’t carry psychological burden about tools. Tools are means, not identity. If a tool helps you reach your goal, you don’t need to obsess over whether the method looks elegant enough. I really like this sentence: “Real masters usually keep an apprentice heart.” When solving engineering problems, use community resources and search engines well. The world is big enough that many problems you face have probably already been recorded somewhere.
6. Debugging and Engineering Habits (Optional Advanced)
6.1 Error Reading and Localization: How to Read Traceback and Narrow the Problem
It’s normal for beginners to fear errors. I used to get nervous seeing red text too. Later I realized errors are more like navigation: they tell you roughly where the problem is.
Keep these four questions in mind:
- Which Python/program am I actually running? Check
where python, then verify VS Code interpreter is the same environment. - Which line did the error happen on? The last part of traceback usually gives filename and line number.
- What external dependency does this line rely on? Usually packages, file paths, permissions, or network.
- How do I verify after fixing? Build a minimal repro and rerun after changing one thing at a time.
ModuleNotFoundError: No module named 'xxx'
Typical causes are missing package or package installed in wrong environment.
Do this: confirm interpreter, install package in current environment, rerun same code.
After fix you should see: this error disappears and execution continues.
FileNotFoundError: ...
Most commonly wrong path or wrong startup directory.
Do this: confirm current working directory, run with absolute path first, then switch back to relative path.
After fix you should see: file is read successfully and subsequent logic starts running.
SyntaxError
Most common causes are missing colon, unclosed bracket, or bad indentation.
Do this: jump to error line and inspect previous line, fix symbols and indentation, rerun minimal code.
After fix you should see: interpreter no longer exits immediately.
6.2 Breakpoint Debugging: Use VS Code to See Variables and Flow
- Open the
.pyfile you want to run. - Click left of line number to set a red breakpoint.
- Click
Run and Debugin sidebar, or pressF5. - First run asks for environment; choose
Python. If it asks to createlaunch.json, confirm. - When program pauses at breakpoint, inspect values in
Variablespanel. F10step over,F11step into,Shift+F11step out.
You should see: program paused at breakpoint, variables panel updating, and line-by-line execution control.
total = 0
for i in range(1, 6):
    total += i
    if total >= 10:
        print("hit", total)
        break
print("done", total)
Set breakpoint at total += i, and you’ll see how total changes each iteration. Debugging isn’t for show, it’s for saving time.
6.3 Engineering Habits: Directory Structure, Markdown, File Types, Commits
project-hello/
  src/
  data/
  output/
  README.md
  .gitignore
Put code in src/, input in data/, output in output/, usage notes in README.md, and non-tracked files in .gitignore. Once structure is clear, debugging gets much easier.
Try to use English paths and filenames, not for style points, but to reduce weird cross-tool compatibility issues.
A minimal README can start like this:
# project-hello
项目作用:xxx
运行方式:python src/main.py
依赖:xxx
输入在 data/,输出在 output/
You can think of Markdown as “plain text + lightweight markup.” It’s not a binary format like Word, so it’s great for Git version control and easy cross-platform opening.
It appears everywhere in engineering: README, project docs, issue records, blogs, study notes. Once you learn the minimal syntax, you can reuse it across many places.
Tool-wise, VS Code can edit it directly. A Markdown extension like Markdown All in One is recommended. Preview is only a display mode; it doesn’t change your file itself.
If you prefer WYSIWYG, Typora is also great. I use it for long writing; the flow feels smoother.
For minimal syntax, these are enough to remember:
# 一级标题
## 二级标题
- 列表项
```python
print("hello")
For links, this article prefers angle-bracket style `<https://...>`: consistent, direct, and less formatting trouble after copy. (`[text](url)` also works, choose what you prefer.)

Mini README template you can copy directly:

```markdown
# project-hello
这个项目是做什么的
## 运行方式
python src/main.py
## 输入输出
输入在 data/,输出在 output/
Three common pitfalls: inconsistent list indentation, unclosed triple backticks, and Chinese punctuation in code blocks. Chinese punctuation is usually fine in Markdown prose, but in code it often breaks execution.
High-frequency file types are enough at first: .py/.md/.txt are code/text and can be opened directly in editor; .json/.csv/.xlsx are common data formats, first two are editor-readable and table files can be opened in Excel; .yaml/.yml/.toml are common config formats, pay attention to indentation and keys; .zip/.7z should be extracted first; .exe/.msi are installers, not data files.
File extension doesn’t define everything, but it’s still a useful first signal for choosing the right tool.
Habit 1: small commits, one clear change per commit.
Habit 2: commit messages in plain language, use verb + object like add notes, fix path.
You’ll probably have a moment where something gets broken badly. If your commit history is clear, you won’t panic and rollback is fast. This habit looks small, but pays off when things go wrong.
7. Hardware Basics: Understand What Your Computer Is Doing
7.1 The Four Hardware Pieces: CPU, GPU, RAM, Storage
First separate these four terms, and configuration sheets become much easier to read. CPU is like the command center, good at general-purpose computation and complex branching, so single-thread performance is often important. GPU is more like many workers doing tasks together, great at parallel workloads like graphics rendering and matrix-heavy deep learning.
RAM is your “workbench,” where runtime data is kept temporarily. The bigger the bench, the more things you can spread out at once. In phone communities, ROM is often casually used to mean “storage,” but in PC context, what people call “ROM/storage” is usually persistent storage like SSD/HDD, not strict read-only ROM.
One more practical layer: RAM is volatile temporary space. While programs run, variables and caches stay on this workbench. Once program exits, computer restarts, or power is cut, this data is cleared. Values you see during breakpoint debugging are also runtime state in RAM, and they disappear when process stops. That’s why reopening a program often loses half-computed intermediate results unless they were written to disk.
Most common misconception in one sentence: memory (RAM) is not the same as storage (SSD/HDD). One is temporary runtime space, the other is long-term file storage.
Many laptops show both iGPU and dGPU, and that’s normal. Integrated GPU (iGPU) is inside CPU: power-saving, cooler, and enough for coding/docs/daily dev. Dedicated GPU (dGPU) is separate silicon: stronger for graphics and parallel compute, suitable for gaming, 3D rendering, video export, and model training.
Automatic switching is the system balancing power and performance: light tasks on iGPU, heavy tasks on dGPU. Practical note for beginners: learning programming itself doesn’t require a dGPU. But if you’re heading into deep learning, NVIDIA CUDA ecosystem is more common. You can still learn without dGPU; training is just slower.
7.2 Storage and Interfaces: HDD/SSD, SATA/M.2/NVMe
One sentence to remember first: both HDD and SSD are for long-term storage, not RAM. HDD is like an old warehouse: large capacity and cheaper, but slower, noisier, and more sensitive to shock. SSD is a modern warehouse: faster, quieter, and shock-resistant. Booting, package install, and opening projects all feel snappier.
Beginners most commonly mix up three things: form factor, interface, and protocol. 2.5-inch SATA is typically cable-connected; M.2 is the card-like form factor; NVMe is a protocol usually running on PCIe. If two drives look like M.2 but speed differs a lot, protocol differences are often the reason.
Before buying/installing, check specs in three steps to avoid pitfalls:
- Check motherboard/laptop spec page first: confirm whether it supports
SATAorM.2before purchasing. - Check details: M.2 length (e.g.
2280) and slot protocol (SATA/NVMe) must match. - Check resource sharing: some M.2 slots may disable SATA channels; on laptops confirm expansion support first.
One language detail: when people say “my phone’s 256G memory is full,” they usually mean storage space is full. Just understand the meaning; no need to argue terminology.
7.3 RAM Sticks and Frequency: DDR4/DDR5 and Speed Indicators
In real scenarios like “browser + VS Code + Python + spreadsheets,” 8GB can run but fills up quickly with many tabs. 16GB is the current sweet spot for learning and moderate development. 32GB gives more headroom for VMs, data processing, and video editing.
For SSD, at least 512GB is usually more comfortable. Reason is practical: development environments, package caches, project files, and datasets keep growing. 256GB gets tight quickly. Don’t stare only at CPU; a strong CPU with tiny RAM still feels constrained.
DDR4 and DDR5 are memory generations. They are not freely mixable; compatibility depends on motherboard and CPU platform. Check compatibility first, then parameters. “Newer generation” doesn’t mean every machine can upgrade directly.
For frequency labels, vendors may use MHz, MT/s, or casually Hz. Treat it as speed tier. Higher frequency can help, but perceived performance won’t always double because bottlenecks may be CPU, disk, or program design itself.
A practical order for beginners:
- Compatibility first: does motherboard/CPU support DDR4 or DDR5?
- Capacity second: secure
16GBbaseline, then32GBif needed. - Frequency last: increase one tier if budget allows; dual-channel (two matching sticks) is usually more stable.
In real development, browser + VS Code + Python + spreadsheets usually hit capacity limits before extreme frequency limits, so capacity often impacts experience more.
7.4 Quick Model Reading: Intel / AMD / NVIDIA
One overall rule first: naming conventions change with each year, suffixes evolve too. If you see a new suffix, check official docs instead of guessing.
For Intel CPU, read three parts: series, generation, suffix. i3/i5/i7/i9 are broad positioning, but the same i7 across generations can differ a lot. In examples like i5-12400, i7-13700K, i7-13620H, i5-1340P, check generation first, then suffix: K often means unlocked overclocking, F often means no iGPU, laptop H/HX usually performance-focused, U low-power, P in-between.
AMD CPU is similar: start with Ryzen 3/5/7/9 positioning, then generation numbers. For models like Ryzen 5 5600, Ryzen 7 7700X, Ryzen 7 7840HS, Ryzen 5 7530U, numbers broadly represent generation and class; laptop suffixes often include H/HS/U. Also know APU (stronger integrated graphics) exists; it helps with light graphics and light editing tasks.
For NVIDIA GPU, the easiest mistake is this: bigger number isn’t always stronger unless you compare generation first. GTX is generally older generation, RTX usually includes newer feature sets. Example RTX 3060 vs RTX 4060: identify generation first, then compare 60/70/80/90 tiers within the same generation. Ti/SUPER are usually enhanced variants in that generation. Also remember Laptop GPU with same name is not equal to desktop performance. For AI, VRAM matters a lot: 8GB is entry level, 12GB is much more comfortable, and 16GB+ gives better room for larger models/images.
7.5 Self-check and Remote Use: Task Manager, Device Manager, RDP, Server
- Check memory and storage first:
16GB RAM + 512GB SSDis a stable baseline. - Then check CPU generation and class: don’t judge by
i7/i9label alone. - Only if your tasks are AI/gaming/rendering, prioritize dGPU; NVIDIA ecosystem is often more convenient.
- If portability and battery matter more, iGPU laptops can absolutely handle programming study.
- Finally check display, ports, and weight based on your usage scenario.
Your current computer is very likely enough to start learning. No need to wait for a “perfect machine” to begin.
Now that you’ve learned CPU/GPU/memory/storage concepts, next step is mapping them on your own machine. It’s not complicated. Three entry paths are enough.
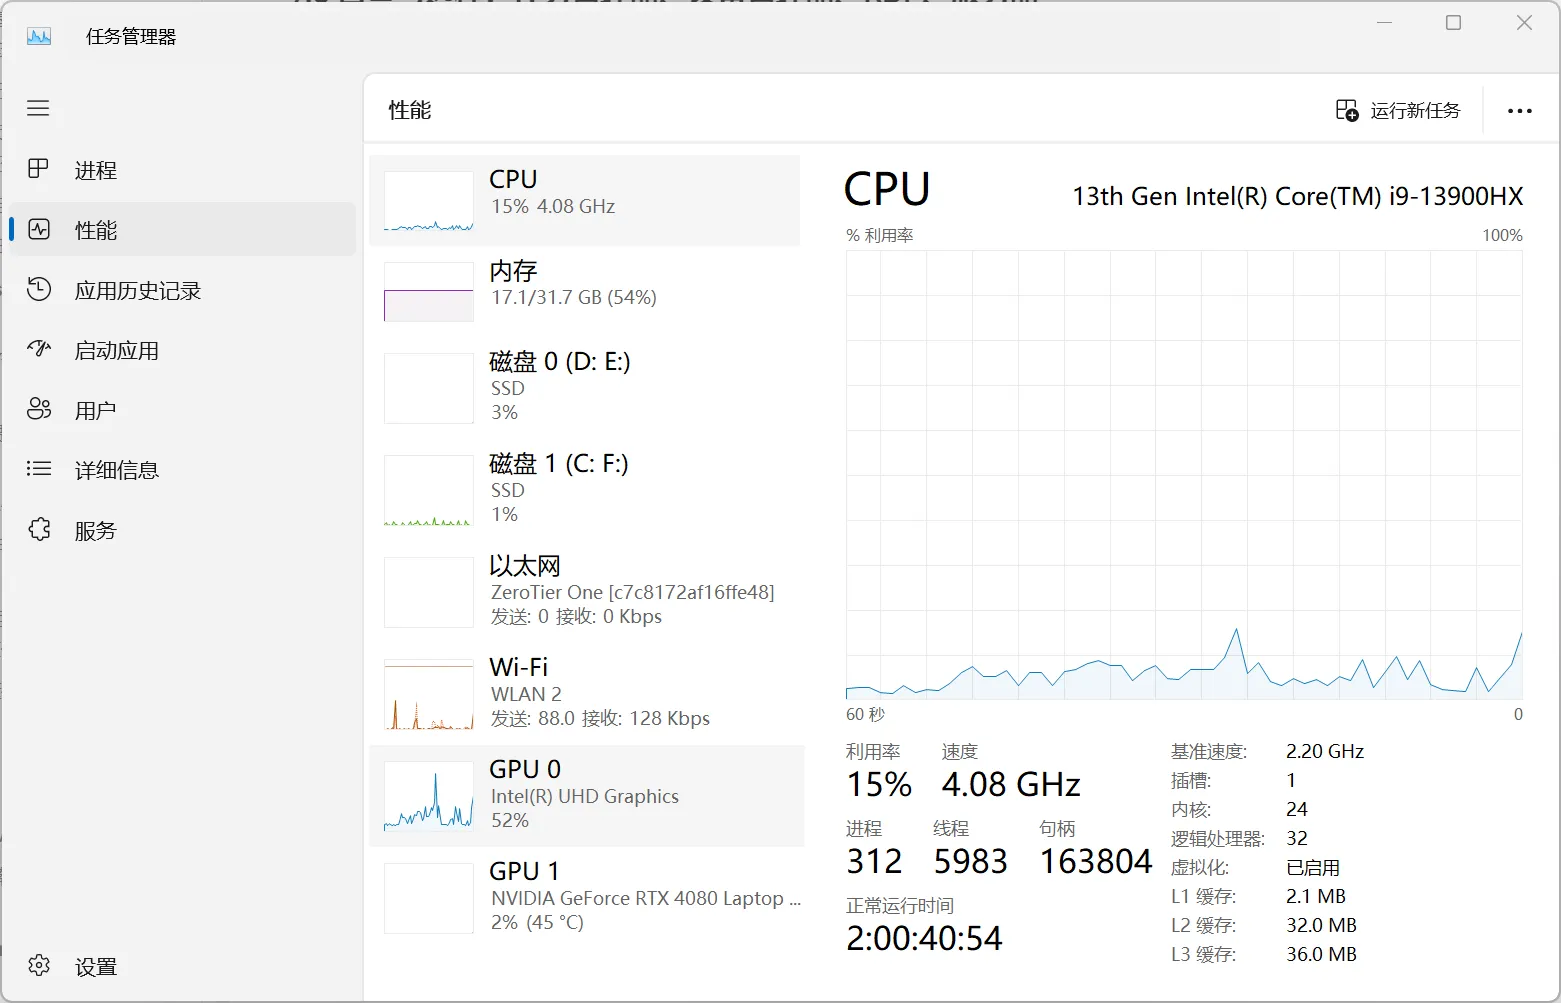
A) Task Manager -> Performance (most common)
- Method A: right-click Start menu, open Task Manager.
- Method B:
Win + R, typetaskmgr, press Enter. - If you only see simplified view, click “More details” first.
- Go to
Performance, then clickCPU / Memory / Disk / GPUone by one. - You’ll see: CPU model and base speed, total memory capacity, disk model and active time, GPU name and VRAM usage.
B) Device Manager (hardware list and driver state)
- Method A:
Win + Xmenu -> Device Manager. - Method B:
Win + R, typedevmgmt.msc, press Enter. - Expand
Display adapters / Processors / Disk drives / Network adapters. - You’ll see device name lists; yellow exclamation usually means abnormal status.
C) Third-party tool: TUZB Toolbox (optional)
If you want one-screen overview, use it as supplementary tool. Download: https://www.tbtool.cn/.
- Method A: open browser and visit the official URL above.
- Method B:
Win + R, directly enterhttps://www.tbtool.cn/, press Enter. - After opening, check pages like hardware overview/sensors to compare CPU, memory, disk, and GPU.
- If values differ slightly from Task Manager, trust system entries first and use third-party data as cross-check.
Display details vary by brand/device, but entry path is stable: check performance page first, then hardware list, then optional third-party cross-check.
First skill: open it. Three methods, pick one:
Ctrl + Shift + Esc.- Right-click taskbar -> Task Manager.
Win + R, typetaskmgr, Enter.
Second skill: know which tabs to read:
Processes: sort by CPU/memory to find what’s consuming resources.Performance: watch real-time CPU/memory/disk/GPU usage.Startup: startup apps (name may vary slightly by Windows version).
Third skill: end frozen apps correctly:
- Confirm it’s an app you recognize and it’s frozen (e.g. browser/editor).
- Select the process.
- Click
End task. - You should see app window disappear and CPU/memory usage drop.
One safety line: don’t end unknown system processes casually, like System, Service Host, Windows Explorer. If unsure, search process name first or take a screenshot for record. A process is basically an “instance of a running program.”
If you’re not sure whether it’s a system process, don’t end it first; copy process name and search it, you can usually judge in 30 seconds.
A common scene: PC suddenly becomes very laggy. Open Processes, sort by CPU, find one process staying above 90%. Save your current work first, then end that process. Usually this brings the machine back to usable.
Device Manager is not a “magic driver installer.” Its first value is helping you verify whether hardware state is normal.
- Method A:
Win + X-> Device Manager. - Method B:
Win + R, typedevmgmt.msc, press Enter. - Focus on four categories:
Display adapters(GPU),Processors(CPU),Disk drives(storage),Network adapters(network card). - If you see a yellow exclamation mark: right-click device ->
Properties->Device status, read system-provided cause first.
Beginner-safe order for driver updates:
- Get drivers from hardware vendor or laptop OEM official site first.
- Avoid unknown third-party driver packages.
- Windows Update may provide drivers too, but not always the latest.
If you see two GPUs (iGPU + dGPU), in most cases that’s normal and aligns with automatic switching logic discussed above.
One-sentence definition: remote desktop means “use another computer as if it were your own,” with display/keyboard/mouse behavior similar to local operation.
Typical use cases: connect to home/company PC for files, connect to lab machine for tasks, connect to cloud server for deployment and maintenance.
Most common Windows connection steps are straightforward:
- Press
Win + R. - Type
mstsc, press Enter to open Remote Desktop Connection. - In
Computer, enter target machine IP or hostname. - Click
Show Options(optional) to fill username and avoid retyping. - Click
Connect. - Enter password and confirm certificate prompt on first connection.
You should see: a new window pops up, showing the other machine’s desktop, where you can open apps/files like local.
Four common pitfalls:
- Target machine is off or asleep: connection fails directly.
- Remote Desktop not enabled on target: enable it in “Settings -> System -> Remote Desktop.”
- Network unreachable causes timeout; in public network, port forwarding/tunneling may be needed.
- Account permission insufficient can also deny access; not all Windows editions are suitable as remote host.
Security-wise, keep it simple: don’t store passwords everywhere, and use strong passwords whenever possible.
You can think of a server as a “24/7 working machine.” It prioritizes stability, continuous operation, and remote maintainability, not direct sitting-in-front interaction experience.
The easiest beginner misunderstanding: servers are not mysterious. At core they are still CPU + memory + storage computers. Difference is mainly usage and operation mode. Your laptop is a personal workstation; a server is a long-running production machine.
Many servers have no monitor/keyboard attached, not because they can’t, but because daily operations don’t need it. Admins typically use SSH or RDP for config, deployment, and logs.
Once you connect the full flow, it’s clear: write code locally -> push to GitHub -> deploy to server. You’re moving a program from your dev machine to another machine that runs continuously.
Desktop PC keywords are expandability, cooling, and cost efficiency. Great for fixed long-term development, multi-monitor setup, and gradual hardware upgrades.
Laptops emphasize portability, with a balance between performance and battery life. Suitable for study, classes, and mobile work.
Phones are mostly ARM-based and better for “using services” than as primary dev devices. They work well as auxiliary terminals via remote control/cloud services.
Workstations target professional loads like rendering, simulation, and AI, where stability and expansion matter more. Don’t be intimidated by the name; match it to your actual tasks.
Servers are about long uptime, remote administration, and stability. Many scenarios use Linux, often without GUI or with minimal graphical environment.
A practical decision framework for beginners:
- Ask first: am I learning programming, or already doing heavy rendering/training tasks?
- For study and daily projects, prioritize usability:
16GBRAM + enough SSD usually matters more than chasing top-tier model names. - If you need fixed desk and multi-monitor setup, lean desktop; if you move often, lean laptop.
- Only consider workstation/server when your task clearly requires them.
- In most cases, the computer you already have is enough to start building projects.
Conclusion
If you can follow this article once from start to finish — even just once — set up your environment, run python in terminal, write a loop in VS Code, create a repository on GitHub, and submit successfully, then you’ve already completed the core of “getting started.”
Many people think programming entry means “memorizing syntax,” but I prefer seeing it as a practical life skill: can you break down a problem, find references, verify attempts, stay calm with errors, and finally reproduce results? You’ll find that real gap usually comes not from raw cleverness, but from whether this workflow is stable.
One final line: tools are means. Using Python, VS Code, GitHub, or AI plugins is all fine. The key is not “what tool I used,” but “did I understand the problem clearly and build a working result.”
To reduce your psychological burden, I want to be direct: this blog site and this article were also heavily AI-assisted. ChatGPT helped me write a lot, and it worked very well. It saved me significant time that I could spend on other things, and it improved my efficiency in a very direct way.